| Home | About Us | Bookstore | Supply Co | Catalog  | Calendar  | Contact Us | Bookmark Us  
One Step Lotion and Crème Making Recipe & SoyWax Candle Techniques


Letter from the EditorGirl Time

Yes, its "girly" time.  We have just added the cutest accessories in the world to our supply company, including really cute pink freezer gel eye masks that truly do help reduce swollen eyes. 

Oh, yes, and since sample spatulas are so very popular, we purchased a really cute style known as the "boomerang."  In this issue we really hit home on making your own lotions and crèmes.  We find that making these items also leads directly to making your own cleansing milks and cleansing crèmes.  Once you master mixing oil with water, the possibilities are unlimited!

Top     Be a Mabel Club Member!     Craft Supply Store    Mabel Archives 

Making Crème and Lotion in a Blender with Emulsoy

Lotion and Crème' is basically making oil and water mix.  Introducing our New One Step EmulSoy!  (TM) We made lotion and crème' making even easier!   Our recipe makes 40 ounces of the best lotion or crème!  Forget the stearic acid, and borax  as well as messy and costly emulsifying waxes!  This one is pre-measured for this recipe and does it all!   Always best to have your containers ready and labeled.

Basic Emulsoy™ Lotion Instructions Makes 36 ounces

Ingredients:

1/4 of one 4 Ounce Bar of EmulSoy™

27 Ounces of Distilled Water, Aloe or Hydrosol

9 Ounces of Carrier Oil

1/3 ounce Germaben IIE

Up to 2 Tablespoons Essential or Fragrance Oil

10 Drops (ROE) ROSEMARY OLEORESIN EXTRACT

Stick blender, Pyrex Measuring Cup (2), Rubber Spatula, Oven Mitts, Candy or Cooking Thermometer, Sterile containers (Mason jars work well) to hold finished lotion.  See recent article on "free pouring--click here"

 Instructions:

Cut the Emulsoy™ bar into a quarter bar. Measure the carrier oil (or combination of oils) into the microwave-safe Pyrex measuring cup. Add the Emulsoy™ to the oil(s). Microwave until the EmulSoy bar disappears. This may be up to 4 to 6 minutes.  Remove and set aside.

Now measure out the water part into the second measuring cup and heat it in the microwave until it reaches 168 degrees. This is to kill any organisms which may already be present in the water. If using glass, remove with oven mitts, set aside and cover with a paper towel to avoid contamination. Allow both the water and the oil to cool down to 120 to 110 degrees Fahrenheit.  *They should be mixed at similar temperatures, no matter what that temp is--to mix properly.

Slowly pour the oil mixture into the water, blending with a stick blender as you pour.  Never add water to oil--it will do a volcano thing.  This is another reason you do not dump oil all at once into water.  When the lotion is 120 to 110 degrees (about 20 minutes) add the Germaben IIE. Blend with a stick blender in a sterile container.  You can use Alcohol 90% or higher to wipe down an object--to ensure it is sterile.  This is also the time to add any scent, or precious essential oils.

Consistency.  Do not let it fool you.  It may look like beautiful half and half just after you make it. Over night it will swell up to at least three to four times the thickness you first see.  

Basic Emulsoy™ Crème Instructions

The same method as making lotion, except you will use 50% oil and 50% water, and 1/2 bar or more of Emulsoy.   


Click here to buy EmulSoytm.

Top     Be a Mabel Club Member!     Craft Supply Store    Mabel Archives 

Making Cleansing Crème 

Night creams nor cleansing creams seem much different than simple lotion.  It appears to be all in the marketing.  So, I recommend using the lotion or crème recipe above to make your cleansing products.  I looked at what I consider my favorite creamy cleansing cream for years, Almay, and found it is basically water and mineral oil. Yuk. After noticing that, I think I could do better, by far. Even though I have oily skin, I understand the purpose of adding more oil to your skin is to lift any dirt up and out, thus I use cleansing creams and not soaps.  Using cleansing creams instead of soaps has always worked for me. I have always known that it helps to have your face as warm as possible when using a cleansing cream, to really open up the pores and clean them.

My idea of cleansing crème or "milks" would include:  Olive or castor oil, Rose water, Calendula and/or Comfrey teas (for the water portions,) and a few drops of Essential Oils such as Lemongrass, Clary Sage, Geranium, Sweet Birch Tree oil, Bergamot, and/or Lavender, as well as a few drops of Vitamin E oil.  For dry ingredients I may want to add Golden Seal root and/or Mugwort.  So combinations may be Olive/Rose or Castor/Calendula and other additives that compliment those essences.  I would probably add a lot of Vitamin E and some ROE to my cleansing cream to extend the life of the oil, and make my cleansing cream in small batches.  No matter what few ingredients I use to make my cleansing cream, based on the lotion recipe above, anything is better than the water and mineral oil I have been using until now.   Presently I am using a Black Cumin Seed and Carrot oil base I am very happy with.  It turned out a pastel green color with an aroma from heaven.  

Top     Be a Mabel Club Member!     Craft Supply Store    Mabel Archives 

Holistic Pet Care Ideas  (Please click here to see our new pet division with GREAT recipes)

As you may have read in the last newsletter, Gabrielle, a five year old Golden Retriever we recently adopted, is our new Editor in Chief of our Family Pet's division.   Judea Bentley, one of our editors from Nebraska suggests to put a teaspoon of coconut oil in a canine's food for over all good health and a nice coat.  Sandy Maine, author of many herbal related books including Clean Naturally:  Recipes for Body, Home and Spirit suggests using a glycerin soap base with Calendula, Comfrey and Golden Seal root to help heal  canine wounds.  Essential Oils are very powerful, as we are now just learning, and we suggest you purchase the book above that has the exact formulas for "Cloud's Healing Soap."  Cloud is the name of Sandy's pet.   Sandy also has a cute and practical natural flea collar recipe, among many other great recipes, that is made up of Essential Oils such as Peppermint, Geranium and Rosemary, but as we said the exact amounts are very important when dealing with Essential Oils.        

In response to our last article about pets and health care, one reader had this to say:

There are pills or can come in liquid form to take that can contain Omega-3, Omega-6, Biotin for example.  A television show suggested sesame oil from the grocery store.  My vet suggested peanut oil that can even be bought in a gallon sized container at the grocery store when I bulked at the expensive pills I could have gotten instead.  I opted for the peanut oil since it was the cheapest since we have to buy Thyroid and Estrogen pills for our dog.  I don't measure but it is a teaspoon or slightly less I mix right in with the dog food each time.  I feed my dog three times a day.  My dog had constant rashes.  After giving her the peanut oil, her skin problems have been cut 95%!  Her fur is so soft now.  I was told if my dog got stomach upset to start with a small amount but my dog, Sara, had no problem.  Gabrielle looks soooo cute!  Sylvia 


 If anyone has tips on how to use essential oils on a dog's fur and what oil to put on their food for a better coat, and so on, please submit to mabelco@tampabay.rr.com  Attention:  Gabrielle.  I have read a lot of stuff on the net regarding pet care, but  have long forgotten most of it.  

Top     Be a Mabel Club Member!     Craft Supply Store    Mabel Archives 


Product Labeling

I get many e-mails asking how to make labels, find the right labels for homemade products and so on.  In a previous issue, I discussed the very basics of FDA labeling rules which are paramount to be aware of.  Click here to see that article.  As for the low-down on making labels, lets get to it!  

First of all, most containers are white, so it is easy enough to obtain white labels.  (I swear that clear labels smear and you will totally regret using them.)  I bought Avery Label Design Pro a few years ago.  To make labels, I simply type in the label style number into their software, and from there I can design my labels, as the right measurements do pull up properly.  My canvas to work with is clear.  The program was around $25 last I knew.  Since office supply stores seem to carry three brands, Avery, Avery, and Avery, I figured sticking with Avery was a wise move.  Labels are not a  huge area of expense, but the final product of your labels is EVERYTHING!  You can print up to 90 labels per page if you get the smallest size!  That is kind of a return address label.

When I have a product I want to package, I find the container first,  preferably white.  I make sure who ever I am buying my containers from is a strong company with a fair price and will be there if I find I need more containers.  You do not want to be stuck with a theme that does work, sells great, and suddenly have no source for your containers.  For that reason, I  make sure that the company I am buying containers from is not the only one selling the item, and have a plan "B" on where I would get them.  With a plan "B" in hand, I proceed to do the following:

I put all of the containers I am considering into a tasteful bag with a handle and walk into a local office supply store with the bag.  Having the containers or packaging with me helps me match up what Avery label number would be appropriate, if any.  I then write the Avery style number that fits best on the container in permanent marker.  I usually do not buy anything that day--I just go home and think about what looked best.  Sometimes I just have to go to the Avery site because the store may not sell unique cuts I know they offer, such as round ones, for our lip balm tins.

As for the graphics that I choose for the label, well, I usually create them or pull them into Paint Brush to work on.  Paint Brush is a very simple Windows feature.  I have used many sophisticated graphics systems in the past ten years and I have found that good old Paint Brush really does so much for such a simple program.  Anything Paint Brush cannot do, I may clean up in a more serious graphics program.  I do not want color around my label, as very few labels print to edge.  You just want to use all the color you can in the middle.

I typically pull my graphic through Avery Design Pro and use the Avery fonts to write my text.  This is because pulling text in though Avery or any program from another program, looks very fuzzy and just not clean.  At times I write my test right over the graphic I pulled in.    

To make labels stick better, I run a GLUE STICK across each one as I place it on the container.  I want to be sure the label is going to stay put.   I have been told to spray the entire sheet of labels with a coat of acrylic spray, before I start using the sheet, so they will not bleed or run as bad if they get near water.  Another good solution is to find shrink bands for your containers and this helps with the "tampering" rule as well as protects your label.  Shrink bands slide over the product and a blow dryer will make it conform!  

The last resort to avoiding stickers altogether would be the "hang tag" method and that is simply a business card folded in half. I have seen MANY cute tags done this way, usually around the neck of a product.  Once it is folded in half, you simply place a neat hole punch at the top corner and you can secure the hang tag onto your product using the hole, with raffia, string, or whatever seems to fit your theme.  This can also be created in Avery using their business card stock.  I hope this article was helpful!        

Top     Be a Mabel Club Member!     Craft Supply Store    Mabel Archives 

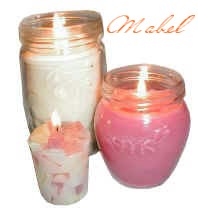
How to Make Soy Candles:  Making Yankee Type Candles for Under $4   

I thought everyone knew SoyWax™ flakes are just another item we melt in the microwave, mix with some fragrance oils and simply pour!  Trying to save $20 on a Yankee candle is the very reason I became interested in crafts in the first place.  Every three months or so I make 20-40 soy candles that look just like the big Yankee ones for about $4 each.  Soy appears less expensive than paraffin, is much easier to clean up than paraffin, burns clean with no soot as well as burning much longer.  Plus it support OUR Farmers.  I pour any excess fragranced soy, which I always have, into 4 or 6 ounce travel tins.  The cost of the 26 ounce frosted apothecary jars that I prefer are usually the most expensive item, and I do have to import them.   The jars on the left were just cute jelly jars that I had one day for excess soy.  I tend to recycle the used jars the next time I make candles by heating a used candle jar gently in the oven and wiping it clean with a paper towel, before I begin my next batch. Some jars seem to make it three times and they eventually do not look as nice as new ones.     

The inventor of SoyWax™ told me that keeping the wick straight, is a three step process.  Pour  an inch of soy into the jar, first inserting the wick in the center as it cools.  Once the wick is stable, then pour the majority of the candle, adjusting the wick again as that cools.  This tends to cause a line across the top of your candle when you pull it straight. Thus for the last step after you center the wick, he pours a final 1/2" or so layer to cover up the line at the top of the candle that centering the wick caused.  I cheat and just glue gun my wicks straight in the glass before I even get started on pouring.

Wicks:  German Cotton Braided wicks are considered the best.  I buy mine long so I can always cut to size. Better to long that too short!   Zinc wicks are not meant for natural products.  Paraffin is a man made product.  So, the key to remembering wick size is natural/soy/cotton and man made/paraffin/metal wick.   Another issue is that many vendors are selling donut oil as SoyWax™, and this is causing the candle to drown rather early.  

Fragrance:  Soy has as a good a fragrance throw as Paraffin based candles.  I use about 1 ounce of fragrance oil per pound of soy when making candles.  Our fragrance was made especially for a good "throw" for soy candles.   Too much of any fragrance oil, and your candle will drown.  I also add 2-5% beeswax to my soy candles for a very rich opaque consistently.  Beeswax is so hard, I start  melting that before I start melting soy in with it.  Vybar helps a candle keep its color and is a great aid to help fragrance oils bind to the wax.  Vybar looks like white wax chips.  Vybar is not critical to a good candle--just nice to have.  A teaspoon per pound.

Color:  Pigments and dyes seem to be a major culprit in a "sick" candle.  Everything goes through the wick, including fragrance--so be sure any color you use is oil based and made for soy wax.  Soy should not be poured while piping hot because it will cause a curdled effect.  I would also add my fragrance oils in once the wax has cooled down a bit so they do not evaporate with such high heat.  Until recently, soy could only produce pastel colors, no matter how much color you wanted to add.  

Making a Candle:  So, when making Candles, I get my containers ready and labeled, with the wicks nearby.  I have any oil based fragrances I intend to use handy.  I then get the largest pliable plastic bowl that can fit into my microwave and fill it up with the  . It takes about 12 minutes to melt 4 cups.  Wearing kitchen mitts, and a garment to avoid splashing my clothes,  I then take it out of the microwave and let it cool long enough to add fragrance and color.   Then I proceed to do the three step wick method suggested above.  The whole event lasts just a few hours and before you know it--you have tons of quality candles at your disposal.  They appear done within an hour--but it is prudent to wait a day for the candle to cure before burning.  

Top     Be a Mabel Club Member!     Craft Supply Store    Mabel Archives