| | Home | | About Us | | Videos | | Supply Co | | Updates | | Catalog | | Contact Us | | Bookmark Us | Retreat | |
Subscribe
FREE and get our e-BOOK with Bath and Body Type Formulas!
![]()
|
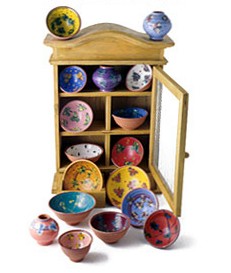
Everyone loves hand painted ceramic and glass. If you have clay in your back yard, all the better! Getting into ceramics and pottery is a real commitment, but with good taste, the rewards are breath taking. The pottery to the left facilitates the use of contemporary shapes and bright colors such as bright yellow with pink. Recently at a craft
show we saw the most beautiful hand made tiles that were 3D in effect. It
was enough to make a person want to redo their entire kitchen and bathroom. A few
tiles had the broken mosaic look with a half of a cup protruding. As we get
into the world of pottery, making hand made tiles is most likely the easiest
learning curve for us and if the patterns come An Easy Weekend Project:
Hand Painting Glass. Years ago I saw the
|
|
Quick and Easy Shopping List to Make Spongeware: Delta's Air-Dry PermEnamel paint in Country Tomato, Dark Goldenrod, Classic Navy Blue, Cape Cod Blue, Light Khaki, Burnt Sienna, Mushroom, and True Green � Delta's Air-Dry PermEnamel Surface Conditioner and Clear Satin Glaze � Sponges � White ceramic kitchenware
|
|
|
|
Use pre-cut leaf or
flower-shaped sponges
|
 |
 |
To achieve
interesting variations in When sponging, try
mixing and |
|
When choosing sponges, pick ones that have different-sized cells for a varied design. If using a sea sponge, cut it in half for a flat surface. To get variations in light and dark designs, vary the pressure when applying the sponge. To create an antique look, use two shades of a similar color (we used Cape Cod Blue with Navy Blue and Dark Goldenrod with Burnt Sienna). Or, lightly sponge a neutral color, such as Khaki or Mushroom, as a first coat to age the whiteness of the china or as a final coat to soften and age the colors. |
|
|
| | Home | | About Us | | Videos | | Supply Co | | Updates | | Catalog | | Contact Us | | Bookmark Us | Retreat | |
 out right, one we can use to actually revamp our
kitchens. Making our own tiles, we can save tons of money and still have
that very rich look. It can't be that hard and we are game! We also decided,
as an alternative to the time consuming two bake process we could use the same sponge ware
techniques described below which allows you to paint simple white tiles, anyway
you like, and simply coat when done with a two coat Delta glaze. If this is
OKAY to use for food service, it must be fine for making your own hand painted
tiles. Home Depot sells plain white and bisque colored tiles for about 30 to
70 cents each. This would be a great project for kids! Who knows what
designs they may come up with. We are going to try to plaster broken coffee
cups onto our designs and then coat them. You could make a splash board for
your kitchen, cut out one whole section of counter and replace with the tile,
mount four of them to make one wall hanging, and so much more!
out right, one we can use to actually revamp our
kitchens. Making our own tiles, we can save tons of money and still have
that very rich look. It can't be that hard and we are game! We also decided,
as an alternative to the time consuming two bake process we could use the same sponge ware
techniques described below which allows you to paint simple white tiles, anyway
you like, and simply coat when done with a two coat Delta glaze. If this is
OKAY to use for food service, it must be fine for making your own hand painted
tiles. Home Depot sells plain white and bisque colored tiles for about 30 to
70 cents each. This would be a great project for kids! Who knows what
designs they may come up with. We are going to try to plaster broken coffee
cups onto our designs and then coat them. You could make a splash board for
your kitchen, cut out one whole section of counter and replace with the tile,
mount four of them to make one wall hanging, and so much more!  hand painted wine glasses that came
with Perrier-Jou�t Cuv�e Belle Epoque Vintage 1989 and thought they were
so beautiful. I ran out and tried to paint some for my home but the art work
was no where near as good. I since found out you can just tape a photo
inside the glass up against where you would like to paint and follow that!
Be sure not to wash your creations in the dishwasher and use a paint acceptable
for painting glass. Click thumbnail for more detail.
hand painted wine glasses that came
with Perrier-Jou�t Cuv�e Belle Epoque Vintage 1989 and thought they were
so beautiful. I ran out and tried to paint some for my home but the art work
was no where near as good. I since found out you can just tape a photo
inside the glass up against where you would like to paint and follow that!
Be sure not to wash your creations in the dishwasher and use a paint acceptable
for painting glass. Click thumbnail for more detail.


